Troubleshooting
How to enable Developer Options / Mock Locations
First enable Developer Options by finding the Build number in your device settings:
| Device | Path |
|---|---|
| Google Pixel 8/9 | Settings > About phone > Build number |
| Samsung Galaxy S24 | Settings > About phone > Software information > Build number |
| OnePlus 12 | Settings > About device > Build number |
Tap Build number seven times. You will see countdown messages, then "You are now a developer!"
Go to Developer Options and find the Mock Locations setting:
Tap Set mock location app and select GPS JoyStick.
"Failed to detect location (12)" or "GPS signal not found"
This error occurs when the test app reads the mock-location flag on each fix and refuses to continue. The setup guide below covers configurations (Smali, Root, or No Root) that do not expose that flag to the test app.
Nothing appears on the map
Some apps detect if you teleported from your last logged location too quickly. When this happens you get temporarily restricted and have to wait up to 2 hours, or teleport back to the last location the app recorded.
Example: If you are in New York and teleport to California within 5 minutes, the distance is physically impossible in that time. Wait at least 2 hours before opening the target app after a long-distance teleport.
Tip: Plan your teleport distances and respect cooldown timers based on the distance traveled. GPS JoyStick calculates cooldown times automatically based on distance. The timer is designed to err on the side of caution. It may suggest slightly longer waits than strictly necessary. Users who are confident in their timing can move sooner at their own discretion. The timer is a recommendation, not a hard lock: GPS JoyStick does not prevent you from teleporting before it expires. For the complete cooldown table, see the Location-Based Games Guide.
"Disconnected From GPS" error or blank map
You can generally ignore the "Disconnected From GPS" message as long as you can still interact with the app. To fix a blank map:
- Open your collection in the test app.
- Tap and open any item.
- Tap and open the Map view - the map should now be visible.
You may still see the disconnection error, but if the map loads and you can interact with it, everything is working.
Rubberbanding / teleporting back to original location
On some devices and Android versions, the location may bounce between the mocked position and your real position.
Try these fixes:
- Clear Google Play Services cache and uninstall its updates. Also clear the test app's cache. Try denying location permissions to Google Play Services.
- Use the GPS Jump Fix options visible on the GPS JoyStick Home screen.
- Adjust the Process Interval in Settings (advanced - only change if you know what you are doing).
- Use the app indoors where GPS signal is weaker, reducing interference from real location data.
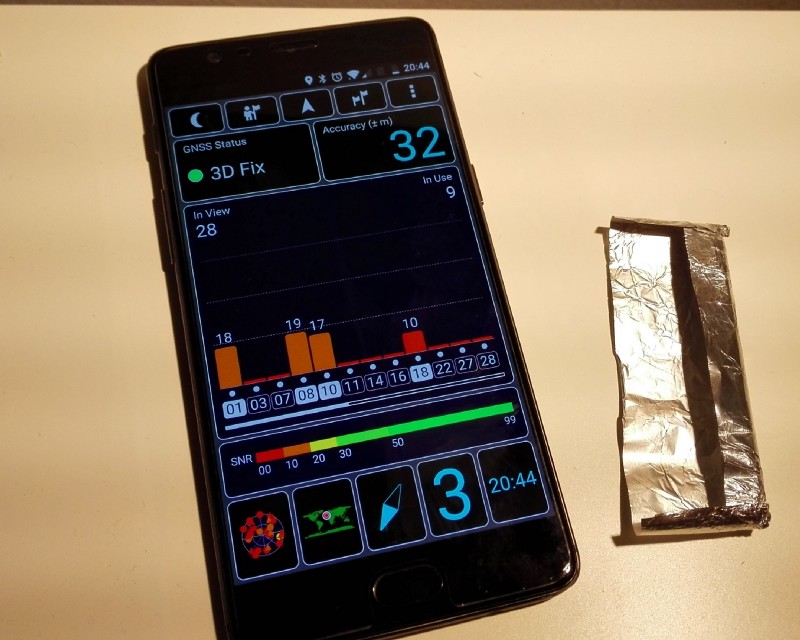
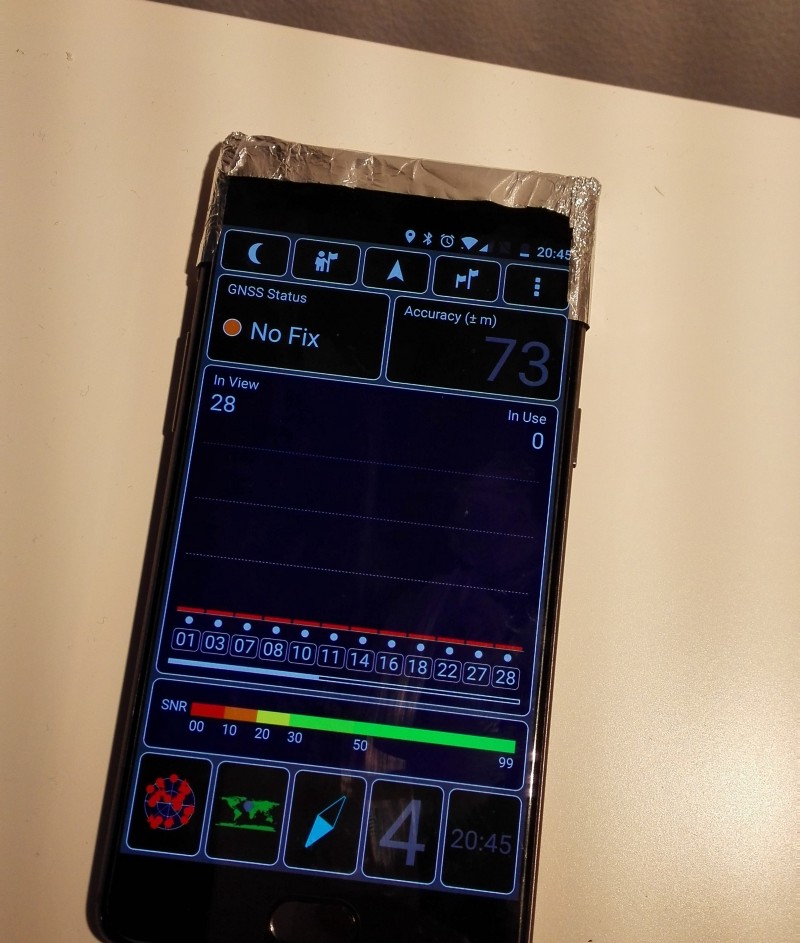
- Physical GPS blocking: Some users place tin foil between the phone case and phone to attenuate the GPS signal.
Device GPS settings that reduce rubberbanding:
Most rubberbanding comes from your device's real GPS competing with the mocked position. Disabling assisted location features forces the device to rely only on GPS satellites, which are easier for the mock to override, especially indoors where satellite signal is weak.
- Open Settings > Location (or GPS/Location, depending on your device) and confirm Location is ON
- Change the location mode to one of the following (the exact label varies by device and Android version):
- Set to GPS Only or Device Only (not "High Accuracy")
- Or disable Improve Location Accuracy under Google Location Accuracy
- Or disable Google Location Accuracy entirely under Location services
- Disable these additional features if present:
- WiFi scanning and Bluetooth scanning under Location > Improve Accuracy (or Scanning)
- Google Location History for the Google account used in the app you are testing
- Google Location Sharing
- Find My Device (or disable its location access)
These settings prevent your device from using WiFi access points, Bluetooth beacons, and Google's network location service to determine your real position. With only GPS satellites active, the mock location has less competition.
For a complete device setup walkthrough covering Samsung, Pixel, and OnePlus, see the Setup Walkthrough.
Switching between spoofed and real GPS
When you need to use your real location temporarily (for navigation, food delivery, ride-sharing, or any other app that needs your actual position), reverse the GPS settings you changed to prevent rubberbanding:
- Open Settings > Location and confirm Location is ON
- Change the location mode back to one of:
- High Accuracy (instead of GPS Only / Device Only)
- Or re-enable Improve Location Accuracy under Google Location Accuracy
- Or re-enable Google Location Accuracy under Location services
- Stop location mocking in GPS JoyStick (tap Stop, or use the notification controls)
- Close and reopen the app that needs your real location
- If your real location does not appear, restart your device
Returning to spoofed location afterward:
Repeat the rubberbanding prevention steps above (set to GPS Only, disable WiFi/Bluetooth scanning, etc.) before resuming GPS JoyStick. This ensures the mock location takes priority again.
Movement speed reference
GPS JoyStick has three configurable speed modes. The app ships with defaults of 10, 40, and 75 km/h. Many users adjust these depending on the app they are testing:
| Mode | App Default | Commonly Adjusted To | Why Users Adjust |
|---|---|---|---|
| Walking | 10 km/h | 9 km/h (or 4-6 km/h for strict apps) | Some apps cap distance credit at or near 10 km/h |
| Jogging | 40 km/h | 15-20 km/h | Some apps enforce speed thresholds on features like auto-collection. 20 km/h is a common cap |
| Running | 75 km/h | 30 km/h | Some apps flag or limit functionality above 30 km/h (typical vehicle detection threshold) |
Tap the Speed toggle button during movement to cycle between Walking, Jogging, and Running. Speed values are configurable in GPS JoyStick's Joystick Settings. For more detail on configuring speeds and understanding their impact, see the User Guide speed modes section.
Joystick disappears when switching apps
The on-screen joystick may disappear when you switch to another app. This is usually caused by aggressive battery management or memory optimization on your device.
Fixes:
- Disable battery optimization for GPS JoyStick in your device's battery settings. The exact path varies by manufacturer - search for your device model and "disable battery optimization."
- Disable memory cleaner apps (such as Clean Master) or add GPS JoyStick as an exception. These apps force-kill background services.
- Check foreground service limits. Some Android devices allow a maximum of 3 foreground services. Close other services that may be competing.
- Enable "Save Last Location" in GPS JoyStick Settings to auto-save the last position as you move. This preserves your position if the joystick restarts. Note: This may slightly reduce performance during normal operation.